Wednesday, July 8, 2015

Dining Out: Minero, Charleston SC

I know that Charleston doesn't scream "authentic Mexican!" but, Minero is exactly that. An award winning upscale yet  casual spot with the must delicious tortillas--it cannot be missed. 

             Minero, Charleston SC
For more information, visit their website:  minerorestaurant.com/charleston/


For this post, you will notice that there are significantly more photos than the last (Hominy Grill), because it was at Minero that I decided it would be fun to write a food blog. Not a bad place to begin! 

Minero's walls are well lit, exposed brick, which adds a cool and somewhat glowing atmosphere--a refreshing break from the steaming hot southern weather.  

Another impressing feature of the decor is each table's individual set of drawers! When you slide out your drawer, you see that it is complete with utensils and plenty of napkins. This was a big excitement to me for some reason; a nice creative touch! (see below)


Minero is know for their tortilla which blends together three different types of corn. So, obviously we wanted to test those tortillas out, and ordered a few items that would highlight them. 

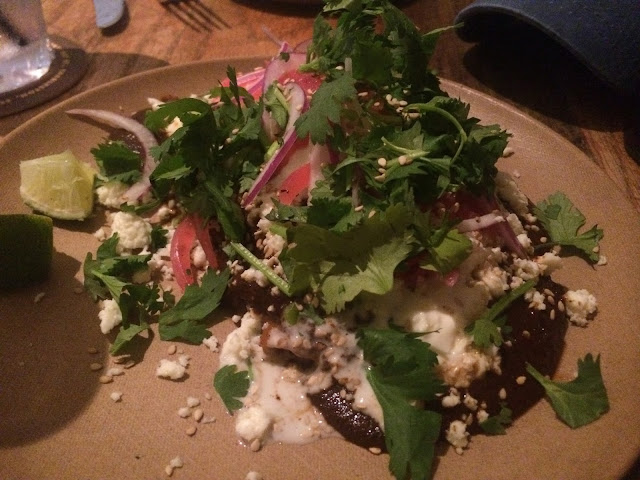
We started with the Enmoladas de Mole Negro, pictured below. They were folded tortillas smothered in a dark mole sauce, and covered with cilantro, limes, onions, and cotija cheese. I actually scraped the plate clean. The mole had complex flavors and was the perfect blend of spicy and sweet. I decided to be over the top and requested an extra tortilla to mop up the sauce with, and was disappointed to hear that it would be a $7 charge for an entire extra plate of tortillas--a single wasn't possible. This was my only disappointment at Minero, and probably meant to be anyways. 


Next, we tested out the tacos. We ordered the three listed below:

Pork Carnitas Taco: This was our favorite of the trio. It was juicy, flavorful, and stuffed with thick slices of well cooked pork. The skin was crispy, which added a nice texture. 

Grilled Steak Taco: Tasty, but our least favorite. We felt that the taste and texture didn't quite live up to that of the carnitas. Another downside was that one member of our party strongly dislikes cheese and picked this taco because there was no cheese listed, only find that it was packed with cheese when it arrived at the table. Don't worry--I took care of that and scraped out all of the cheese onto my plate...so it did work out well for some of us. 

Charcoaled Chicken Taco: This one was a huge hit too. The peaches added a sweet tangyness, and the pickled onion added a good bite and sourness. 

See picture below for a repeat visual (larger version above): 


Last but not least, we ordered the Shrimp and Masa Grits. My goal on this trip is to try as many variations of shrimp and grits, and Minero's interpretation has so far been the most unique. 

This dish was incredibly flavorful, and quite spicy. The chorizo added a great kick, and improved a somewhat soupy texture. The grits seemed to be pureed, and were quite silky. I prefer a bit more texture, but they were delicious none the less. This was another bowl scraper, and I'd definitely go back for it. (Sorry for the lack of photo--I guess I was too excited to dig in!)


Tuesday, July 7, 2015

Dining Out: The Hominy Grill, Charleston, SC

I cannot even come close to expressing how pleased I've been with the food scene in South Carolina. "Low country cooking" is absolutely delectable, and I just can't get enough of it. We started  out a two week boating trip in Charleston, and were in for quite the treat--literally. The Hominy Grill was our first stop! 

The Hominy Grill: Low country cuisine
Visit their website for more info: http://hominygrill.com

The Hominy Grill was recommended to us by many, and for good reason.  Big shout out for the recommendation from my bestie, Emily and her husband Max, whose opinions on food I value the most. I fully agree with them that the Hominy Grill is a must try in Charleston.

The Hominy Grill is known for their classic low country cooking and atmosphere. The restaurant is located in the middle of a residential neighborhood, a little ways out of the main area of Charleston. We took a cab there, and as we approached I could immediately identify the restaurant by the huge mural on it's side, with the wisest words I've ever read: "Grits are good for you." I literally could not wait to get inside.

While we waited for our drinks on the outdoor patio, we were impressed to see that there was a little window to the bar for customers to order drinks! Obviously we took the opportunity to have this experience, and ordered "The southern G & T" and the "Blackberry Collins." Both drinks were great, though the Blackberry Collins was particularly unique and refreshing--made with honeysuckle vodka, lemonade, and blackberry syrup. 

Our friendly waitress made some ordering suggestions, all of which we took. Our party of four each ordered a different item, and we of course did a lot of taste testing of each dish. Our order, including appetizers, is listed below:

Fried chicken breast: collectively our whole table thought these were incredible. They had just the right amount of crunch and grease, and somehow didn't make us feel like we had over indulged before the entrees had come out. 


Fried green tomatoes: we were a little bit less obsessed with these. There wasn't a whole lot of flavor to the actual tomatoes and breading. However, there was a homemade ranch sauce that accompanied the tomatoes, which I didn't eat because I'm an anti condiment weirdo. Perhaps wit the sauce the tomatoes would have been a bigger hit.

Shrimp and Grits: Pictured above, these were some of the most classic, simple, and delicious shrimp and grits I have tried. The grits had a perfect texture, not to soft, and not to hard. The mushrooms were a nice touch, and the scallions added a nice crunch. As a Bostonian who considers herself a shrimp and grits expert (you can laugh) I think these were a classic interpretation of the low country classic.  

Shrimp Bog: To us Northerners, this dish seemed quite similar to shrimp and grits, but a bit soupier. The andouille sausage added a lot of flavor. 

Catfish Creole: This dish highlighted okra and a sweet tomato-like sauce that I couldn't help myself from picking at all night. Too bad it wasn't my plate...
Catfish Creole


COCONUT LAYER CAKE: I don't know how I've lived a happy life for the last 29 years without knowing of the existence of coconut layer cake. Our waitress told us that it was a Charleston specialty. The cream cheese based frosting was a perfect compliment to the unbelievable cake packed with coconut. I can't stop thinking about this dessert. I officially am adding this to my summer bucket list: bake a semi-decent coconut layer cake at home! 


Dining In: Grilled Roasted Veggie and Goat Cheese Pizza

This is a more challenging but amazing pizza that I like to make after I've warmed up with the margherita. Packed with veggies, pesto, and goat cheese! 


The veggie pizza recipe is one of my all time favorites. I kind of feel like I'm being healthy when I eat it because I'm packing the pie so heavily with vegetables (kidding myself). The preparation can be time consuming, but the results are always amazing. See below directions to create this pesto based pizza, adapted from Pizza on the Grill.

Ingredients: 
1/2 a ball of pre-made dough (see dough recipe for details)
Basil pesto
Goat cheese (crumbled is easier)
One yellow or red onion
Grape or cherry tomatoes (heirloom mix is the best!)
1 small eggplant
1 yellow bell pepper


Veggie preparation: 

*You can either put the veggies onto the grill and fire them up before putting the dough on the grill, OR you can roast them in the oven and on the stove. Totally up to you! I will give grilling directions below, as kitchen directions are pretty self explanatory. 

*Preheat the grill on medium-high if you are planning on grilling the veggies. 

STEP 1:


Quarter the onion. Place each piece gently on the grill, and do your best not to let them drop between the cracks. Close the oven and leave them on there until they are charred to your liking. Depending on the size of your grill, you can do them at the same time as the peppers and eggplant.

If your grill is small, follow these same directions separately with the yellow pepper and eggplant. 

STEP 2:

Half the tomatoes, and put them onto a grill safe pan. Close the grill and leave them there until they have broken down and are slightly caramelized. 


STEP 3:

Put the pesto and goat cheese onto a tray with all of the veggies, and transport out to the grill with knives and spoons for the decorating phase. 


Pizza Directions: 

STEP 1:

Cover a dry and clean surface in a handful of dried grits or cornmeal. Roll the ball of dough in the grits or cornmeal until it is covered.  This will add texture and will make the pizza nice and slippery for pulling  on and off the grill. 

STEP 2:

Stretch the dough out into a circle, rectangle, oval...whatever you can manage--be flexible because it is often very elastic and springy, and can be challenging to stretch. The pizza will look "rustic" if your shape is weird, so have no fears! Aim for 1/2 an inch thick, or even thinner if possible. 

STEP 3: 

For the actual grilling steps, it is  it is super helpful to have more than one person on the job. Depending on your grill setup, you may need to get creative with lighting as it is very important for you to be able to see clearly for this project. If you are like me, without a light by the grill, you may be lucky enough to find a guy with a headlamp handy. See below. 


Use a cutting board to transport the pizza dough over to the grill.  Carefully lift the dough using two hands, and stretch it across the middle of the grill. ( I usually have a helper hold onto the cutting board while I do this). Set the cutting board to the side, because you will use it again shortly. 

It's okay if the pizza is slightly folded on the grill. That too will look "rustic," trust me. Close the lid! 

STEP 4: 

Keep the pizza on this side for about 8-10 minutes. Check periodically to make sure that it isn't over cooking, by gently lifting up the corner of the pizza and peeking under. When the pizza has lovely black grill lines, take that bad boy off, and put it on the cutting board. 

STEP 5: 

Before decorating your pizza, turn the middle of the grill off, so that the pizza will get indirect heat when returned with toppings. Leave the two side burners on.

STEP 6: 

Decorate your pizza! Start by spreading the pesto generously on top of the grill marks. Scatter the veggies on top, and layer them with crumbled goat cheese. Be generous with your toppings--we all know that the more cheese and veggies, the better! 

STEP 7:

Gently slide the pizza back onto the middle of the grill, and close until the toppings are toasted and melted to your liking.

STEP 8:

Fill your hungry belly! 


Dining In: Grilled Margherita Pizza

   The all time classic margherita pizza. Delicious and simple! 


Did you know that once upon a time in Naples (and I do mean Italia, not Florida) the margarita pizza was created to represent the Italian flag: red, white and green. This classic pie which I can never seem to get enough of was apparently created in order to impress Queen Margherita--and wasn't she lucky!?


When I plan out my pizza menu for an evening of grilling, I almost always put the classic margherita on my list in addition to a couple of other more adventurous pies. I also prefer to cook it first. I'm not sure why, but it always seems right to start simple and familiar. 


Ingredients: 

1/2 of the prepared dough ball
Dried grits or cornmeal 
A box or jar or stewed or chopped tomatoes (Pomi is the best!) 
Fresh basil
Fresh mozzarella cheese thinly sliced (how ever much you like)
1-2 garlic cloves minced 
A few pinches of sugar 
Pepper and salt to taste 

*Tip: prepare ALL of your ingredients for the pizza BEFORE putting the dough on the grill. Place them into easily portable containers on a large plate or tray, so that they can be transported and easily accessed during the grilling process.  


Sauce Directions: pour the tomatoes into a medium sized bowl. Throw in a few pinches of sugar to sweeten it up, and mix in the minced garlic, salt, and pepper. Set aside. 


Pizza Directions: 
STEP 1: 

Preheat the grill. Turn the heat up to medium-high on all burners, and close the lid to keep the heat in as you prepare your dough. 

STEP 2:

Cover a dry and clean surface in a handful of dried grits or cornmeal. Roll the ball of dough in the grits or cornmeal until it is covered.  This will add texture and will make the pizza nice and slippery for pulling  on and off the grill. 

STEP 3:

Stretch the dough out into a circle, rectangle, oval...whatever you can manage--be flexible because it is often very elastic and springy, and can be challenging to stretch. The pizza will look "rustic" if your shape is weird, so have no fears! Aim for 1/2 an inch thick, or even thinner if possible. 

STEP 4: 

For the actual grilling steps, it is  it is super helpful to have more than one person on the job. Depending on your grill setup, you may need to get creative with lighting as it is very important for you to be able to see clearly for this project. If you are like me, without a light by the grill, you may be lucky enough to find a guy with a headlamp handy. See below. 


Use a cutting board to transport the pizza dough over to the grill.  Carefully lift the dough using two hands, and stretch it across the middle of the grill. ( I usually have a helper hold onto the cutting board while I do this). Set the cutting board to the side, because you will use it again shortly. 

It's okay if the pizza is slightly folded on the grill. That too will look "rustic," trust me. Close the lid! 


STEP 5: 

Keep the pizza on this side for about 8-10 minutes. Check periodically to make sure that it isn't over cooking, by gently lifting up the corner of the pizza and peeking under. When the pizza has lovely black grill lines, take that bad boy off, and put it on the cutting board. 

STEP 6: 

Before decorating your pizza, turn the middle of the grill off, so that the pizza will get indirect heat when returned with toppings. Leave the two side burners on.

On a nearby surface, flip the pizza to the side that has already been grilled, so that the grill marks are facing up. Cover it in your homemade tomato sauce, then mozzarella slices, and then the basil. 

STEP 7:


Slide the pizza back onto the grill in the middle, and close the lid. Leave it on for 5-7 minutes, or whenever things seem nicely crisped and melted to your liking! 

STEP 8:

Fill your hungry belly.


Sunday, July 5, 2015

Dining In: Pizza Dough for the Grill

Once you master the dough creation from this post (surprisingly easy!), you too can create your very own Margharita Pizza.


I've dreamed about putting teaching on the back burner so that I can open up a grilled pizza shop. The two things that hold me back every time I consider it are: #1: I am a teacher through and through, and #2: even though grilling pizza is one of my all time favorite things to do, it is exhausting manual labor. 

But, it's totally worth it. I promise! I've compiled a few favorite recipes with suggestions and adapted recipe ideas from an amazing and comprehensive cookbook called "Pizza on the Grill," by Bob Blumer and Elizabeth Karmel. 

The first time I grilled pizza, I was skeptical when I saw that my new book suggested that I put the gooey dough directly onto the grill. Wouldn't it seep in between the cracks and fall through?! That would be disastrous considering that I had literally kneaded the dough with my own two hands.

Magically, the dough crisps rapidly when you put it onto the grill, and it is hardens just in time before it is able to slip through the cracks. Have faith: it will work! 

Pizza Crust
Makes enough dough for two medium sized pizzas.

*TIP: One time I tried to be healthy and used whole wheat flour. Don't do it. It makes the crust dense and bread like, rather than airy and crisp.

Ingredients: 

1 packet of dry active yeast 
3 cups of flour
1 cup of warm water 
3/4 of a cup of olive oil
2 tsp of honey
1/4 tsp of kosher salt 


STEP 1: 

In a medium bowl, combine water, olive oil, and honey. Drop the yeast over the liquids, and wait for it to foam.

STEP  2: 

In a large bowl, combine the flour and salt. 

STEP 3: 

Slowly add the liquid to the bowl of flour and salt, 1/2 of a cup at a time. Each time that you add 1/2 a cup of liquid, stir the mixture until the liquid is combined with the flour. Eventually you should have an elastic like ball of dough. 

*If it's too sticky, add more flour. If it's too powdery, add more water. 

STEP 4: 

Take the dough out of the bowl, and put it onto a flat surface that is covered in flour. Kneed the dough using the palms of your hands (really get in there!) for about 1-2 minutes. Don't go much over that, or it will get tough. 

STEP 5: 

Generously coat the inside of a medium bowl with olive oil. Drop the dough in and roll it around so that it's covered with oil. Pour extra oil over the ball of dough. 

STEP 6:(last step!)

Cover the dough with plastic wrap or tin foil, and set aside at room temperature for at least one hour. Let that guy rise! 

New Blogger

These are my badass onion goggles. No more tears! 


Tonight as I was uploading roughly 1,500 photos onto my computer (obviously because I had run out of room on my iPhone, yet again), it occurred to me that at least 60% of my photos from the last year are of food. New recipes, old recipes, dining out on lavish meals and delicious hole in the wall pizza...you name it. Food. It's everywhere, and I can't stop thinking about it. Or talking about it. Or eating it.

About three years ago I realized that I had literally no idea how to cook. I'd been a foodie who appreciated high quality food and restaurant exploration (understatement: I lived for it), but I was unable to do much more than follow a simple recipe. When I did get up enough motivation to attempt a recipe, the mediocre cooking was usually accompanied by utter chaos in the kitchen, and an insane clean up aftermath. So one day, three years ago, I said to my roommate: "This is the year I will learn to cook." It's a work in progress, but I've come a long way from my meager beginnings in the kitchen. 

Instead of just obsessively taking pictures of my food so that I can look at them over and over again by myself--let the blogging begin! At the very least, I'm hoping this will be a fun way for me to keep track of the recipes, creations, and dining experiences that I have. Maybe someone else could find it helpful too!